Light it Shoot it Retouch it Live Minneapolis

First of all, you will have to excuse the grainy pictures. I was shooting at f2./8 with the camera above my head praying that I got something in focus. I was shooting at 1600 ISO under the “romantic lighting” as Scott Kelby called it. PS. what’s the deal with both of the subjects putting their right hands up? That’s weird timing. Anyway, you can get an idea for the room, the stage, and the screens showing Lightroom or Photoshop.

Ok, let me back up. Yesterday I was at the Light it. Shoot it. Retouch it. seminar put on by NAPP, and instructed by Scott Kelby. I’ll let the cat out of the bag right up front and tell you it was well worth the day and the $99 (I paid $79 as a NAPP member) cost. The event was held at the Minneapolis Convention Center. Despite it being a huge room with a ton of people, I think the setup worked really well. I got there early enough that I got to pick a seat fairly close, but I think even the folks toward the back wouldn’t complain too much. There was a thrust stage that the NAPP folks were concerned that Scott would fall off of. He would shoot from the end of this back toward the end of the room with a large backdrop setup. He was shooting tethered into his computer, and the images he took would display in a couple of seconds up on two huge projector screens on either side of the stage.

Continue reading

Upgrade to bgStretcher2

The bgStretcher2 script is now at version 2.2. This script allows you to view images full screen using only javascript and no flash. One side effect of showing an image that fills the screen in both height and width without changing the aspect ratio is that you are likely to clip part of the image. If someone comes to your site with a widescreen display and your images are square, then you will not see the bottom of you image. It can’t be helped.

There is a solution, but it involves a compromise. To make sure that you always see the entire image, you need to find whether width or height will fill the screen without clipping the images. Then you will have spaces on the sides or top depending on the aspect ratio of your image. This seems to be what most people are looking for, so I now default the script to do this. This can be changed by setting fitImageToBrowser:false in the config options to reset the script back to the original behavior.

Head Shot Shoot Behind the Scenes

I got an email the other day asking if I did corporate head shots with lights and backgrounds and stuff. I figured that I had lights and stuff, so I bought the backgrounds and did the shoot.

When I first got the email, I was a little apprehensive. I have done studio and some on location shoots before, but not exactly of this type. I do the lighting thing with wedding, high school seniors, family, and even infants, but still, my first inclination was to stay no. Which is why I said yes. I don’t know where I heard it before. I think I have heard it from Chase and Zack Arais, and there are lots of others that have said it too. (I just googled “if it scares it do it” and there was a lot of hits.) I think we have a tendency to hide from something a little out of our comfort zone, but doing so will stretch us in ways we don’t always know, but will usually be beneficial.

So, after checking my email (at a computer client) and seeing this email request, I tried not to think about it too much, and just responded immediately. I don’t know what google magic led a company in San Francisco coming to Minneapolis to find my web site www.christopherwardphotography.com, but they did. They emailed several photographers. I was the first to respond. Not a big ego boost to find out that you just got fast twitch typing fingers, and not great photographs. But what counts is that I got work, the client is happy, and I stepped out of my comfort zone, learned a lot, and was successful.

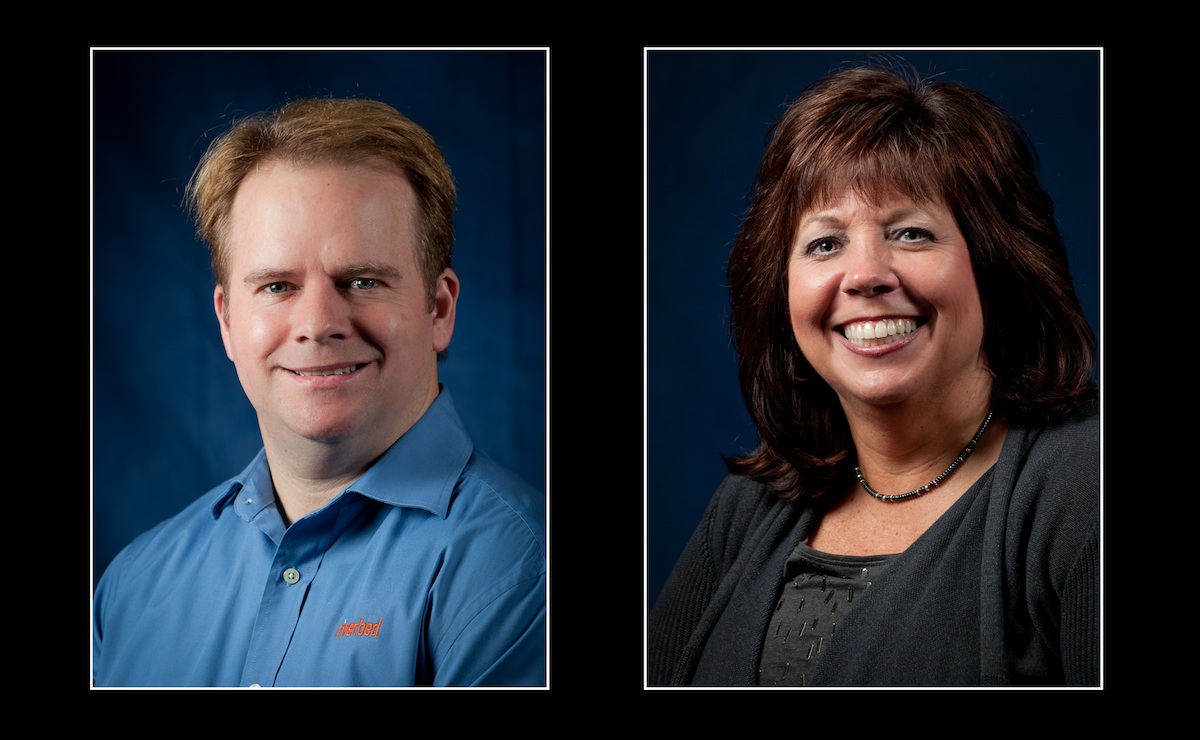
So, this is what I went with. I have 3 Nikon Speedlights. I have one SB900 to camera left in a 24″ softbox as my main light. I have another SB900 to camera right shooting through an umbrella as fill. I shot these TTL, with the umbrella about -1.7 down in a second group.

The third light was going to be deployed as a hair light, but then I decided that the background could use the light instead. Problem was, the SB800 couldn’t be on a 3rd group. My D90 and it’s pop up flash can only control 2 separate groups. So I figured that if I was going to see TTL Joe and David The Strobist at the flash bus tour, I would combine the two. I put the SB800 on SU-4 mode so that it would be triggered just from the other flashes. Problem solved. Sort of. You can see the picture at the top on the left had the light on, and the look I wanted with a little bit of vignette added in post. The pic top right is missing the light. Oops. Somewhere between the setup and the first image and the other shots it didn’t fire. I don’t have quite the separation I would like, but the client still likes the pictures, and that’s what counts.

The background is a new one that I just got from Adorama – a Savage Infinity Light Blue. It looks better on the computer screen that it does hanging. Thankfully, with a little separation of the subject from that background it looks pretty good. This was the second time I used it. The first was in my living room. Yup. I usually use black, or blow out a white background. I pushed all the furniture out of the way, and set up in and around the stuff to try everything out. One thing about doing this is that I knew I could pull this off with minimal room. In the end I had lots of room after pushing away some tables. Felt just like home.

The last piece to this puzzle was shooting tethered into Lightroom. After I had taken a few shots of each of them, I invited them back to the computer. We stepped through the images in full screen and helped them pick the best two. With the initial edit done, back home, all that was left was to put some finishing and portrait retouching on the images. I don’t go overboard with that, so it didn’t take too long.

Well, there you have it. I took a chance, it didn’t go perfectly (lost a light), and yet it still came out well. Bring it on, it was fun.

Best Camera Contest

I entered the Best Camera contest today. This is a contest of pictures all taken on a mobile phone. For me, these were all taken on an iPhone.

I have really like having a camera with me all the time. Sometimes I use it more than other days. Occasionally I forget that I have a camera with me. I find myself saying, “If only I had a camera…” But then, there are other times I remember that I have one, and take a picture I am glad to have.

You can vote on my images if you  would like. Just keep in mind that you can only vote for one image per email address. Here the rest of the images that I submitted.

Some of these images are not as sharp as I would usually like, but holding a phone out away from your face so you can see the back while shooting in low light is not the best way to get images. But, the idea is to at least get the image.

Update of some Wedding Videos

I updated some wedding videos and uploaded them to youtube. These are images from 2009. Here they are. The second video uses the same pictures, but with a different song. The first is a more upbeat song.

I was informed that many people might not like a song this upbeat for wedding images, so I remade the video again with a different song. They are both hosted on my youtube channel.

10×20 Prints of Eli

I wanted to show a client a 3 image print in a 10×20 size
frame. I have been really liking this size. I have been creating
quite a few of these. I especially like a black background with a
black and white photo. It looks even better in a white frame.

I put the image above on my iPad to show the image, but how to show a
frame. I decided to take a picture of a frame I have hanging in my
house, and then insert the image into it digitally. The result is
below. I think it is a good way to show what the print would
look like.

I am now offering a nicer version of the frame above as an option to clients. It is a solid wood frame lacquered white (black and other wood types available).

Christmas Portraits in a Living Room

I took some Christmas portraits of our girls this weekend. These were not done in a studio, just our living room. I put up a background stand and a black material at one end of the room. Then the kids were placed forward of the background 6 to 8 feet. This was done to keep the spill from the lights off the background.

The lights were one or two shoot through umbrellas. The main light was on the left and closer. The fill was on the right, a little farther away, and two stops lower. These were SB900’s as remotes. They were triggered by the on camera flash that contributed nothing to the exposure.

The trick here is getting the kids away from the background, and feathering the light to that most of the light goes across the girls creating interesting shadow, and keeping the light off the kids.

This can be pulled off in any home with enough space to get the kids off the background. With less space you will see the pattern or wrinkles in the background. If you would like pictures like these of your kids, please contact me.

Thanksgiving Portraits

I took my lighting gear to Thanksgiving Dinner this year to take some family photos, but in the end, the images that I liked the best were when the kids sat in a window seat and I used natural light. I had an assistant hold a reflector to direct some of the window light back towards the kids, and I could close the curtains a bit so that I had a bit of a backdrop instead of a blown out window.

I am starting to try out black and white more and more. I don’t always “see” in B/W yet, but I am getting a better feel for the shots that would look good processed in B/W once I look at them in post.

I do have some in color that I liked as well. I couldn’t get all the kids to pose for me. Too much turkey, and too much going on.

Drobo S for Photographers

Some of you may know that I had my computer and several hard drives stolen. Most of that data was backed up other places, but in a miss mash of backup drives. I had 4 external drives hooked up to my computer. A TimeMachine backup, a main images drive, a drive with video, and a drive of older images. It and the video drive were usually not switched on. They didn’t go to sleep well.

It was a big pain. I decided to upgrade. I would buy one unit that would hold all of my current space needs, and provide some redundancy. I went with a Drobo S. I got it Friday, and went to work getting setup. (It is now Sunday Night and I have it all working. My images are on the Drobo, and my Lightroom and Aperture catalogs are on my desktop and all talking to each other)

The drobo unit is not cheap, but still I was surprised to see that all cable options were included. They have a USB2, a Firewire 800, and an eSATA cable.

I was a little surprised that the drives that I ordered with the unit (Direct from Drobo) didn’t come preinstalled. They are in very generic, straight out of a bulk shipment, from Western Digital. The drives come out of their boxes and insert easily with no cables to attach. Just drop them in. The cover on the Drobo S at least, is magnetic. That’s right, no tools required to put drives in or out. I like that a lot.

I also noticed that it does have the little lock slot on the back, which I intend to use. However, because the drives are so easy to get in, there is no way to lock the drives into the device. I guess I will be hoping that the next idiots that break in, if it happens, just get frustrated when the device is locked, and leave it with the drives still inside.

I hooked the Drobo up using the supplied firewire 800 cable. I will see how that is working out speed wise over the next couple of weeks. I will store my images in the Drobo, so it will be interesting to see how it works out. I have done this in the past with USB2.0 only, but I have another option in mind. OWC has an upgrade option, where you send in your computer and they upgrade it to have an eSATA port. It would be underneath where the vents are. This might be tempting, but then I would have to be without the computer for awhile again.

I had 4 different external hard drives that my data was scattered over, 3 of which had a backup. They are all getting combined into the one Drobo. I have 5 1TB drives in this thing. With their Beyond Raid tech, I have single drive failure protection, and 3.62TB of available space for my data. Lets get going…

The first thing I did was to create two volumes. I wanted to do this to provide 1 volume for TimeMachine. If I just provided a folder, not a volume, TimeMachine would never prune and delete old files, just keep on growing. I didn’t want that. I am a little confused about what happened. You have to choose a maximum size, and you have to pick less than the available drive space in order to create multiple volumes. I picked 2TB, and it created two volumes each 2TB. I should be able to add more space later to use the extra (I have less than 4TB, remember). The part I am not sure, is that I read a post that said the second volume will be allowed to expand past that 2TB when you add larger drives. I don’t know about that. I might need to do a shuffle when that happens. It would be better if you could set separate sizes in the Drobo Dashboard config tool. I could set 2TB for TimeMachine, and 12TB or more for the other volume. If it is possible, it sure isn’t clear in the tool or the help files.

Time to copy some data.

I plugged in one of the external hard drives to my computer and started to copy files. This will take awhile.

I came back to the computer (after a night of copying data) and found everything silent. The computer had gone to sleep (set to 3h, 1 drive copy had finished successfully), the drobo lights were off, the fans were silent. Very cool. That I like to see.

I don’t have enough time with the unit right now to give any more data than this, but it seems to be working just fine. My Drobo and the 5 supplied drives are working well. I do wish I could see the temperature of the drives or get individual SMART data from them, but the DROBO is supposed to alert me if something is going wrong.

I’ll let you know more as I learn it.

Nepal Star Trails

I took this picture only a couple of hours before I was sick for two weeks. Yup, I was up on a roof in a t-shirt freezing by the end of the shot. When I came down from the roof I was shivering uncontrollably, and shortly after that I was spending way too much time in the bathroom.

No, I don’t really think that this got me so sick. Probably the flu, or some food, or something, but I was quite sick for a few days, and didn’t really feel “fine” for about two weeks. Anyway, more on the shot:

It was taken in Nepal, in a little town called Bandipur, down a very windy road west of Kathmandu. I was on the roof of the guest house we were staying in.

This is a multiple exposure image. I was shooting at f/4.5, ISO 200, for 5 min per exposure. I took seven pictures of star trails from the same roof that a couple of hours earlier I had taken the sun setting in the mountains picture. I used a simple cable release, and a timer. I then put them together in Photoshop.

They went together quite easily. I just stacked the layers and set the blend mode of each layer to screen. That worked well for the star trails, as only the stars show through, the black sky doesn’t, and you have the trails.

I then added more canvas room to the image, put the stars at the top, the mountains at the bottom. When I had them lined up how I liked them, I had a few stars in the mountains. I then created a mask, and applied a gradient to the mask, white at the bottom , black at the top so the stars didn’t show up on the bottom. I played with that a bit until I got it looking the way I wanted.

Thats it. I have wanted to play with star trails before, but it is amazing how little light pollution it takes to ruin the image. Anyway, it was fun.