Wedding Album Review on an iPad

I had created a wedding album, and the parents of the bride had purchased their copy. The parents of the groom had some changes they wanted to make. There were a few pages, like the one above that they wanted as is, there were a couple of pages that they didn’t want, and several pages that they were hoping to swap a few images. They did live close by, so I headed over to their house with just my iPad. Yup, just my iPad. I wanted to be able to sit side by side with them and draw right on the pages of the electronic book. Best case would be to be able to drag the images around, but that wasn’t going to happen. I would settle to being able to pen in new numbers and draw arrows for moving images around. To accomplish this, I used two apps.

The first was Penultimate. I used this app with a digital pen to draw on.

I created a notebook for this project with the amazing title of Album Notes. I then, page by page inserted a page spread from my album (exported previously) into the notebook. I now had images that I could draw on.

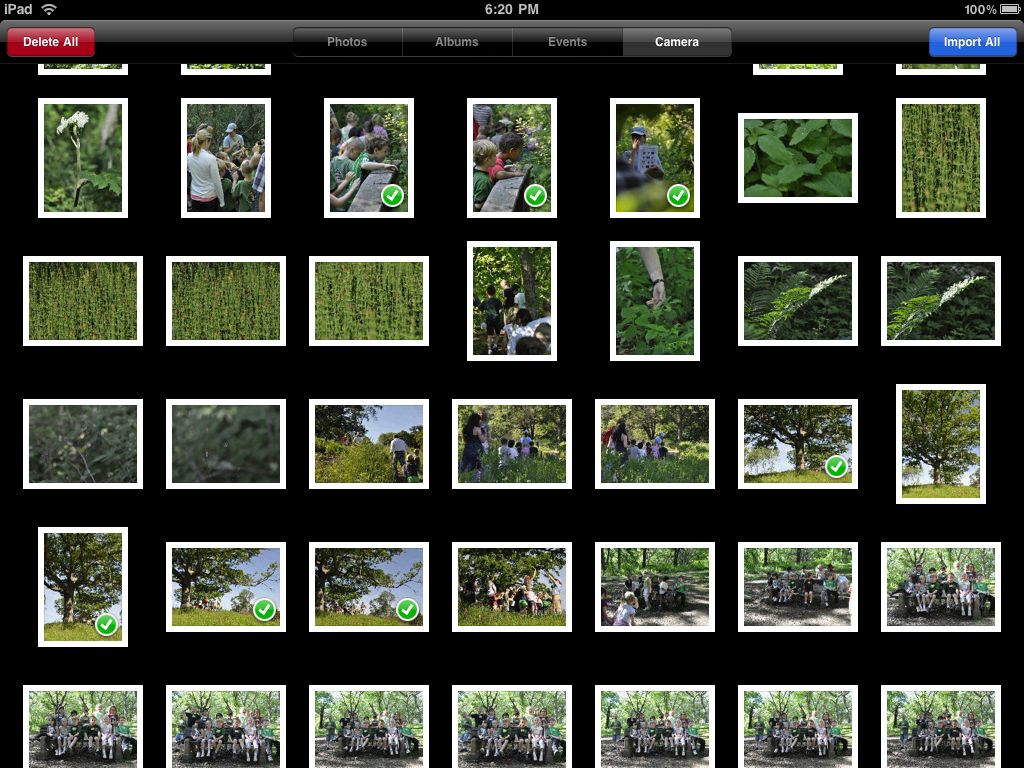
I also used the Zenfolio app. I used it to move copies of all the wedding images I had online to my iPad. One thing that doing this did was keep the image numbers in sync with what the mother of the groom saw on the website, and meant that I didn’t need a wifi signal. One wish I had was that images that she had picked as favorites could have been synced to the app. She had selected and favorited the images she likely wanted to put in the album on the zenfolio website. If those could have been synced it would have made the process easier as well.

This was the process we went through. First I went through and marked with a big red X all the pages that we were going to get rid of, and ‘want’ on the pages we were keeping without changes. When we found a page that had images that we wanted to swap, we would put an X over the image, and come back to it later.

After this we had a count of the total pages we would have, and a count of the number of images we needed. Then, we would go over to the Zenfolio app, pick some appropriate pictures, come back to Penultimate, and pen them in. As pages were finished, I would mark them as done, so we could identify what pages we needed to work on still.

One of the things that worked well was having a special wacom bamboo pen to write the numbers with. Much better than writing with your finger. One thing that was frustrating was that you can’t swipe back and forth on Penultimate. I needed to go back to the TOC, and then pick the page I wanted. You can press the page number in the lower right, but that just goes in one direction, and I constantly needed to go back. Penultimate also doesn’t like to be sideways like this. I would sometimes get my images upside down, and have to turn and twist the iPad until the image was the right way.

It was also slow. I was doing this on the 1st generation iPad, and it quickly pushed my decision to buying a newer version. When I tried this with an iPad 3, it was like night and day. It went from frustratingly slow to just as responsive as you would expect.

I suppose that I could use a tool that exports my album as a PDF, then use a PDF tool that can annotate a PDF. My pages were exported as individual JPEG’s, so that wasn’t a great options when I was short on time, but might be something I try on a different occasion.


New Mobile Photo Blog

20110729-080447.jpg

I have another blog. Because I don’t have enough places to post material already. Well, that’s not quite true. I now have a tumblr blog, but it’s about trying to get focus. I want one place to put my mobile shots. They were getting spread out. Hipstamatic, Instamatic, BestCam, twitter, google+, or stuck on my phone. They will now go here.

Part two of the reasoning is the inspiration from Sabrina Henry and her new mini-me photo blog. I am going to make another renewed effort to look for and take photographs daily. We get so busy, it’s easy to forget to shoot. More importantly, for me anyway, I forget to look. Training yourself to look, and see things that others pass by is part of the challenge and the fun of photography. I need to keep at it. The new tumblr blog is part of that effort.

Buy, upload, read CraftAndVision on iOS

Ever been out with an iPhone or iPad and Craft&Vision has released a new ebook that just have to read right now, but you are not at a computer? Well, there is a way to download directly to your device. It is possible that the concept if not the exact method would work on an android. I don’t know the software on that platform.

20110727-011052.jpg

The first thing you need to do is purchase an ebook. The site as it is currently is quite navigable by a mobile device. It isn’t optimized for mobile, but with a little pinching and moving around it is possible to follow the checkout process through e-junkie and PayPal and buy an ebook. This part of our exercise you could do from another computer somewhere if you have access. Just erase cookies when you are done if it’s a public machine.

Email from Craft and Vision

Once you have made your purchase, you will get an email from Craft and Vision. Check for it on your mobile device email client. Click the e-junkie link.

This takes you to a page on fat free cart’s site. This is where the PDF is stored, and the link on this page contains the unique code that allows you to download the PDF. Now don’t worry. You get s very generous 9 attempts, so you can re-download at home if you want.

20110727-015059.jpg

Press and hold for a second the “Click Here” link. This will bring up an option to copy the link. Press that button. Safari won’t let you save the PDF if you were to just open it. We need another program.

My favorite PDF tool is GoodReader. Navigate back to the main screen shown here if you had a doc open. There is an option for “Web Downloads”. Press that.

In the next screen press the “Enter URL” link.

20110727-105107.jpg


In the screen that pops up, tap and hold a second to get the iOS popup that let’s you paste in the URL you copied.

GoodReader will download it to your device and you can read it right away! Enjoy your PDF’s on your iOS device without your computer.

PS. This post’s images were taken on an iPhone4. Parts blurred using filterstorm, and uploaded and the post started using the wordpress app. I finished it by moving the images into place in the regular wordpress interface.

How to set up Hipstamatic

I’ve been snapping away with my iPhone lately. The app I have been using the most is Hipstamatic. I started with a few issues that bugged me, so I wanted to tell you how I set it up. This is not how everyone needs to set their camera up, just what works for me.

Resolution: this was disappointing. I shot a ton of images that I was going to put in a small book. They were all at the default resolution of 600px. Nuts. Too small to print. It took a long time to figure out that you set the resolution via a sliding switch on the side of the lens. You need to turn the camera around and slide the lever to the left of the lens up. You now have full resolution.

Push the lever on the left up

Composition: this drove me nuts. Some people might like the retro like aspect of not knowing exactly what picture they are taking, but not me. I like to compose carefully. To fix this, you need to be in the Settings app, Hipstamatic section. Here change the Viewfinder Mode from Classic to Precision Framing.

Hipstamatic setting page on the Settings App

Random changing film and lens: Again, maybe I am just not the target retro user of this app, but I don’t want the camera to randomly switch things on me when I shake the phone whether it’s accidental or deliberate. There are two ways to fix this. If you edit your lenses you can pick which lens you want it to pick on shake. Me, I use the sledgehammer approach and turned Shake to Randomize off completely in the settings app.

Set shake to change individually

Metadata: if you want tags and GPS info to make it to your photo sharing sites, you also need to make sure that this is enabled in the settings app. I think this is on by default. You can also set this each time you post. The biggest issue I had to getting this to work on flickr was that I had blocked this feature on the flickr account settings. Go figure.

Now, the reason I started and continue to shoot with this app is one lens and film combo. I saw Josh Bradley using this when he took the portrait that I am using in twitter and Facebook. I downloaded them right away. I use the BlacKeys Ultrachrome B+W film and the Lucifer VI lens. You can get them both in the Portland Hipstapak. It will cost you a couple of dollars via in app purchase. Its the only combo I am using. I know I should be more adventurous.

Anyway, this app is all about fun, so have fun taking pictures.

Drobo S for Photographers

Some of you may know that I had my computer and several hard drives stolen. Most of that data was backed up other places, but in a miss mash of backup drives. I had 4 external drives hooked up to my computer. A TimeMachine backup, a main images drive, a drive with video, and a drive of older images. It and the video drive were usually not switched on. They didn’t go to sleep well.

It was a big pain. I decided to upgrade. I would buy one unit that would hold all of my current space needs, and provide some redundancy. I went with a Drobo S. I got it Friday, and went to work getting setup. (It is now Sunday Night and I have it all working. My images are on the Drobo, and my Lightroom and Aperture catalogs are on my desktop and all talking to each other)

The drobo unit is not cheap, but still I was surprised to see that all cable options were included. They have a USB2, a Firewire 800, and an eSATA cable.

I was a little surprised that the drives that I ordered with the unit (Direct from Drobo) didn’t come preinstalled. They are in very generic, straight out of a bulk shipment, from Western Digital. The drives come out of their boxes and insert easily with no cables to attach. Just drop them in. The cover on the Drobo S at least, is magnetic. That’s right, no tools required to put drives in or out. I like that a lot.

I also noticed that it does have the little lock slot on the back, which I intend to use. However, because the drives are so easy to get in, there is no way to lock the drives into the device. I guess I will be hoping that the next idiots that break in, if it happens, just get frustrated when the device is locked, and leave it with the drives still inside.

I hooked the Drobo up using the supplied firewire 800 cable. I will see how that is working out speed wise over the next couple of weeks. I will store my images in the Drobo, so it will be interesting to see how it works out. I have done this in the past with USB2.0 only, but I have another option in mind. OWC has an upgrade option, where you send in your computer and they upgrade it to have an eSATA port. It would be underneath where the vents are. This might be tempting, but then I would have to be without the computer for awhile again.

I had 4 different external hard drives that my data was scattered over, 3 of which had a backup. They are all getting combined into the one Drobo. I have 5 1TB drives in this thing. With their Beyond Raid tech, I have single drive failure protection, and 3.62TB of available space for my data. Lets get going…

The first thing I did was to create two volumes. I wanted to do this to provide 1 volume for TimeMachine. If I just provided a folder, not a volume, TimeMachine would never prune and delete old files, just keep on growing. I didn’t want that. I am a little confused about what happened. You have to choose a maximum size, and you have to pick less than the available drive space in order to create multiple volumes. I picked 2TB, and it created two volumes each 2TB. I should be able to add more space later to use the extra (I have less than 4TB, remember). The part I am not sure, is that I read a post that said the second volume will be allowed to expand past that 2TB when you add larger drives. I don’t know about that. I might need to do a shuffle when that happens. It would be better if you could set separate sizes in the Drobo Dashboard config tool. I could set 2TB for TimeMachine, and 12TB or more for the other volume. If it is possible, it sure isn’t clear in the tool or the help files.

Time to copy some data.

I plugged in one of the external hard drives to my computer and started to copy files. This will take awhile.

I came back to the computer (after a night of copying data) and found everything silent. The computer had gone to sleep (set to 3h, 1 drive copy had finished successfully), the drobo lights were off, the fans were silent. Very cool. That I like to see.

I don’t have enough time with the unit right now to give any more data than this, but it seems to be working just fine. My Drobo and the 5 supplied drives are working well. I do wish I could see the temperature of the drives or get individual SMART data from them, but the DROBO is supposed to alert me if something is going wrong.

I’ll let you know more as I learn it.

200 Dollars Worth of Batteries

The first picture is a couple of bags worth of me doing my part to destroy the planet. I use my small flashes a lot, and go through batteries like crazy. I can’t tell you how long that is from, but with 3 flashes, one change of batteries equals 24 batteries. I don’t use all three each shoot, but sometimes I do, and I always want to get to a shoot with fresh ones ready to go.

The second picture is what spending $200 on batteries and a charger get you. You read that right, the 8 battery charger that can charge in as little as one hour cost almost $100, and luckily came with 8 batteries. I then purchased 4 more sets of 4 batteries, which at $20 each, throw in some shipping, and voila, $200.

Why did I pick these ones? Drew Gurian. He is an assistant to Joe McNally (and a great photographer himself), and when I was a DLWS workshop, Drew was showing us his gear. I figured, if these batteries are good enough for Joe, then they have to be good enough for me!

PS. The noisy pics were taken with my iPhone, and not really enough light.

How A Photographer Can Use an iPad

The main reason that I got an iPad was to present photographs to people. I wanted to use it as an electronic portfolio. That by it’s self would be a pretty good use, but it has come to be so much more useful.

I had photographed a gymnastics event for the Richfield Gymnastics Club, and had taken stills and some video that I put into 7 videos of the event, from rehearsal to warm-ups to the actual event. The videos were put together into a DVD that the club will sell. I could have put the DVD into a computer, and pulled that out, set it on a table, and had people lean over to try to see the screen. Instead, I handed them an iPad with the videos on it and let them hold the device. It makes a world of difference. As the two people I had brought the iPad to show watched the videos, other came and looked over their shoulders. I really think the iPad was more effective than a laptop would be.

I was taking pictures at a wedding this last weekend, and I was not the official photographer, so I had some time in between the ceremony and the reception. I went home, did a quick Lightroom edit, hard drive export, iPad sync, and I was off to the reception. When I got there, I started passing the iPad around. People were flipping out. They loved being able to see pictures of an event they had just attended. Even better, some people hadn’t been able to attend the ceremony, but were at the reception, and were able to see what had just happened.

Later in the evening, after taking some reception and dance shots, I downloaded images from my memory card to the iPad with the camera connection kit, and then made the rounds again. The challenge will be to do the same thing at a wedding where I am the official photographer, and I don’t know most of the people there. I think it is worth giving it a shot though. It was so well received.

I also have images and video at the ready to pull out and show people as a portfolio. I have done this several times where I wouldn’t of likely had a book with me. Instead of just handing out a card and saying check out my website, I can show them the images I have on my site right there.

There are lots of apps that photographers can use that are not just for photographers. I have created blog posts while on the move, checked out Twitter, my RSS feeds, and verified some content from my website. I have even used the iPad via an app called iSSH to get a command prompt at my web service provider and correct some html on my site. Yes you can do these things on a net book, but you can’t do the portfolio things as well.

If I can get it out of the hands of my family, I take where ever I go.

The Jeffery Clamp

Have you heard of the Justin Clamp? It is made by Manfrotto, and you can get it here from Adorama. It costs $54. Recently I saw a post via twitter on adapting it to work work with a SB900, because the clamp is for a SB800. I can’t find the article/pics, or I would link to it.

Anyway, I have put together my own clamp like this with parts from Adorama.

The above clamp is what it looks like put together. There are three parts that you need.

So, for $32.65 you get pretty much the same thing, but you get pieces that you can reuse for other purposes if needed. Also, this shoe mount will fit any flash, including the SB900.

Ok, why do I call this the Jeffery Clamp? Well, I order stuff through Jeff Snyder at Adorama, so that’s the name I gave it. Give him a shout if you need help ordering stuff from Adorama. (jsnyder@adorama.com)

So, what do I use it for? Well, it can be clamped onto anything, which makes is quite versatile, but here is one thing I used it for recently.

Look at the upper right of this image. See the light there? It is an SB900 on my Jeffery Clamp, connected to the background stand. No need for another pole. I used this like a hair light, or a side light depending on where I aimed the light. Here is a picture where the light was added to bring more light to the right side of her hair.

iPad Camera Connection Kit Review

So, what does the Camera Connection Kit come with for $29.95? A SD(HC) card reader (left), and a USB adapter (right) that plug into the iPad. Seems a little high for what you really get, but hey, it’s the only option right now.

I tried both connections, and they both worked when done as intended. You can take images off your cards, and you can connect your camera via USB cable. However, you can’t connect a hard drive, and I couldn’t find a way to put images from the iPad onto a card. It appears to be a one way deal. iPad as a data consumer again.

When you connect a card or camera, you get the photo’s screen with a camera tab. The screen quickly fills up with dashed outlines for the images on your camera (or card) and then starts to fill in thumbnails.

There are now buttons at the top for “Delete All” and “Import All”. Once the image thumbnails are there, you can choose which images you want to upload to the iPad.

By clicking on a thumbnail, you can select individual images to import. You can flick up and down with your finger to scroll through all the images. These thumbnails are from my daughters field trip to a nature center this week.

Notice the buttons at the top changed from “Delete All” to “Delete Selected”, and “Import All” to “Import”.

Pressing the import button brings up a little drop down where they give you the option of importing all again. Not sure why this is necessary.

The screen shot above seems weird to me. This is where I ended up after doing my selective import. I guess we are here because there are sill possible images to upload, but with items still having that green check box, it is hard to tell if they are selected or imported all ready.

I pressed the Albums tab to get to the screen above. Notice that I now have a “Saved Photos” album with the screen shots I took, a “Last Import” album with the images I just imported, and a “All Imported” album that would have everything I had imported and not erased off the iPad.

What is think is cool about this, is that the images are NEF files. They are Nikon RAW image files, and they show up on the iPad. What I don’t know, is what you edit when you use a program like Photogene. Are you using a built in preview contained in the RAW image, or is the iPad converting. I am leaning to the preview, but it seems to be full size, which surprised me.

You can then get the images off the iPad as if it were a regular camera. Just connect your iPad to your computer via the sync cable. These images won’t transfer via iTunes, you need to import them. I tried Lightroom, iPhoto, and Image Capture on my Mac. The RAW files come off just fine, as if they were transferred directly from your card. One interesting thing I found, was that I couldn’t transfer the screen shots using Lightroom, but they showed up in iPhoto when I tried that. Strange.

So, the question going around seems to be whether this can replace field back up units like ones made by Epson and others. I am not so sure. The screen is big and gorgeous, but it is also big. I think the smaller units while having a smaller screen are more rugged and compact, but I don’t own or use one, so I can’t really comment. What I think would be ideal would be an iPod Touch or iPhone that you could connect this to AND a laptop hard drive or other SSD drive to make a backup to. That would be much smaller and eliminate the need for a laptop in many travel situations. But that is just wishing smoke.

Anyway, it looks like a fun accessory to play with, and I will experiment with using it as a backup device when traveling.

iPad Ready and bgStretcher2 Update

I took this picture, from my iPod, of an iPad showing off my portfolio. It looks amazing. The images are actually sized perfectly for this device. But there was something weird. All the images in the night album, and the occasional other image won’t show. I get the blue image not found icon. Very weird. I wonder if they are exported with some weird settings. Not sure how that happened.

I was also able to confuse the javascript by pressing on the album and next/previous buttons. I will have to take a look at that. As noted yesterday, it doesn’t work well on the iPhone either. I also checked Kelby’s site again, and it looks great too, just not on the iPhone. I am wondering how that device reports it’s screen size. I might just need to look for that browser and then display presized smaller images.

If you want to get a rough idea of what your site would look like on the iPhone, check out iPad Peek. It doesn’t show the broken images like the iPad did, but it will give you a sense of size and how your content will fit. Just enter your site in the address bar at the top.