200 Dollars Worth of Batteries

The first picture is a couple of bags worth of me doing my part to destroy the planet. I use my small flashes a lot, and go through batteries like crazy. I can’t tell you how long that is from, but with 3 flashes, one change of batteries equals 24 batteries. I don’t use all three each shoot, but sometimes I do, and I always want to get to a shoot with fresh ones ready to go.

The second picture is what spending $200 on batteries and a charger get you. You read that right, the 8 battery charger that can charge in as little as one hour cost almost $100, and luckily came with 8 batteries. I then purchased 4 more sets of 4 batteries, which at $20 each, throw in some shipping, and voila, $200.

Why did I pick these ones? Drew Gurian. He is an assistant to Joe McNally (and a great photographer himself), and when I was a DLWS workshop, Drew was showing us his gear. I figured, if these batteries are good enough for Joe, then they have to be good enough for me!

PS. The noisy pics were taken with my iPhone, and not really enough light.

Thank you Kathy Keppel

Credit: Kathy Keppel

I just wanted to thank my second shooter, assistant, and VALS for Kim and Josh’s wedding, Kathy Keppel. Kathy doesn’t do weddings primarily, but I was in a need of a capable photographer, and she stepped up. Many photographers who work on their own won’t assist another photographer, so I am grateful that Kathy was willing to help out.

She is a very capable portrait photographer based out of the south metro (Minneapolis), and you can see her work on her own site at Kathy Keppel Photography.

Credit: Kathy Keppel

Kim and Josh are Married

We couldn’t have hoped for a better day, and what better way to start it off, than with a beautiful dress. We started the day by getting some pictures of the bride getting ready at her sisters house.

They have two very wonderful girls, and it was sometimes hard to stop photographing them, and remember that it was the brides day! Here we are at the wonderful Baker park for the ceremony.

The weather was quite perfect. We had a little bit of wind and blowing veils to deal with, but we couldn’t really have asked for a better day.

I was very glad to be apart of this wonderful day for Kim, Josh, and their whole family. Please have a look through the other pictures in the gallery below. If you know Kim and Josh, they will have access to an online album with many, many more pictures in it. Check with them for permission and the url.

Captured by the Light Tour 2010

The picture above was from David Ziser’s Minneapolis stop on his Captured by the Light Tour from last year. He is back on the tour this year, and I have signed up, and plan to attend. The event in Minneapolis is September 16. It’s a Thursday.

This is a good time. It get’s a little long towards the end sitting in little chairs in tight rows, but the amount of information that he jams into his presentation is pretty amazing. It will be good to go and try to reabsorb some of the information again.

Check out his blog at digitalprotalk.

Register here with code CBLDPT10.

My new studio: uClick Studios

I have been looking for some studio space for a while now. I have had some projects that I wanted to shoot on white seamless, and my living room wasn’t going to cut it. I first looked around my neighborhood, because I wanted something that was in walking/biking distance. That wasn’t working out well. The places I found were small, and yet still seemed expensive.

I looked at possibly getting space with someone else in an established studio building in north east Minneapolis, but the distance to get there, combined with the price, I just wasn’t sold.

Then I came upon uClick Studios. Unfortunately, this is not close to my house either, but it is close to my current consulting job in Chanhassan, and allows me to rent by the hour instead of by the month.


View Larger Map

The studio is run by Tracy Rust, and is just getting going, but she has great enthusiasm, and a ton of great ideas. The studio is available by the hour. I have used it a week ago to do some yoga pictures, and have it again this next week.

The picture above was taken at uClick, and the setup I used in the studio is the picture at the top of the post. I was using white seamless, but she also has several other backgrounds available. There are two shooting bays, and one has windows for using natural light. They will soon have a covering system if you don’t want that light. The space is not huge, but is quite workable for a two light setup with a small number of subjects.

The lighting is being finalized, and there should be a studio light available for the background as well now, or in the near future. The studio provides the lighting and radio trigger that you place on your camera. No need to bring anything other than your camera if you so choose.

Tracy is also working on getting different props and chairs and seasonal props for the studio. These are all things that are difficult to keep and store on your own, so they will be welcomed.

If you are interested in renting space at a great rate, contact Tracy at uClick and check out this new photography studio for rent.

Yoga Pose Pictures Taken in new Studio

I have had a project in the back of my head for awhile now. The idea was to take pictures of people doing yoga poses in a studio environment. Why yoga? Well, I know several people that do yoga, and it seemed different enough from the standard studio type shots, that if would be both interesting to shoot, and hopefully interesting to potential clients.

The first issue I had was to find a studio. That was harder than I thought. My area of Minneapolis is more conducive to high mortgages than to low rent studio space. I then found uClick, a studio that you can rent space from. I will blog more about this place soon, but suffice to say, I now have a place to shoot studio pictures.

Second was to find willing subjects. I asked a few of my friends that do yoga to help me out. First up is Steve. He has been doing yoga for a couple of years now, and has started a training program to be an instructor. A special thanks to Steve for being the first in line. I have been to yoga a few times with my wife, and just started to learn some of the poses. I by no means know a lot about yoga, but knowing something helps in the communication with your model, and knowing when they are in a pose, or transitioning, or how hard it is to hold.

So I mentioned earlier about potential clients. I am looking for individuals that would like their own yoga poses in pictures, as well as looking to approach studios. One possibility is to see if a studio would be interested in having me come into their studio to take pictures. That way I could take pictures of several people, and the cost per person could be lower. If you know of a studio that might be interested, let me know.

Dance and Swimming Portraits

This is part two of my “Proud parents wanting something just a little different from their sports pictures” series. The dance pictures were interesting to take, because she started out a little shy, and I didn’t know what type of dance moves she was capable to doing. I didn’t want to ask for something that she was unable to do, and then have her get discouraged.

The lighting was the same as in yesterdays post. I had a SB900 in an umbrella high on the left, almost directly at her side. I had another SB900 on a gorilla pod stand with an umbrella draped over it. I would have placed it higher, but didn’t have another stand with me.

We started off with some of the more basic, and static moves, and joked around a bit, until she loosened up, which truth be told, was not a very long time. We were then able to get some other “action” type moves where I would capture her in mid air. This picture may not have captured her legs quite as high as some that we took, but it looks the most effortless.

We moved on to the swimming pool late into the light. It was between disappearing fast, and almost gone. We were going to need lights to get anything to work here. The swimming shots were all with one light. When the light was near by, it was not zoomed in, but when taking the shots of her father away, I zoomed the flash to 200mm I think. It was a SB900 hand held by her mother. Sometimes we also aimed it through an umbrella, but not always. The lights were held at pool level. No lights fell into the pool.

I had her going back and forth several times as we fine tuned the lights, and then tried to get the timing down. It took awhile, but got it in the end. I think the pictures we got of the butterfly and the breast stroke were the ones that worked the best. They are the most dramatic looking at least.

These were a lot of fun, and I hope to get to do this again with some other kids soon.

Soccer and Golf Portraits

I was asked to take some pictures of a young man depicting the sports he loves and the guy the parents are so proud of. Every year they get pictures taken by the typical event shooters, and they tend to be pretty static pose, grin, shoot shots that end up looking very posed. We were going to try for more action, and more natural.

This was to be a back yard shoot. Luckily, this house is in the country, with lots of space. There was a large row of trees that we chose to be the back drop for the activities. I placed him probably close to 20ft from the background, so the trees would blur somewhat. I showed up when the sun had started to fall behind these trees, so there was no direct sun. I suppose there was some coming through the trees. I set the camera on manual, and let those spots blow out.

I always seem to forget to take a picture of the lighting setup, so I will have to describe it. I set the main light, a SB900 in a shoot through umbrella high to my left. It is rotated fairly far around on him, 10-20 deg. This was a last minute thing while I was traveling in Canada, and I didn’t have a second stand, so I used a second SB900 on a gorilla pod, on the grass, way around the right side, also about 10-20 deg off axis. I had an umbrella lying over this pointed somewhat up.

The lights stayed pretty constant to the subject. I moved around a little bit to get different camera angles, but the light was fairly consistent. We had a small stick in the grass where he was to stand most of the time.

Many of the soccer shots were timing shots. It took a few takes to get what we wanted, between me, the subject, and his mother. I didn’t want to do much in post, so we wanted to hit it right on the grass. For kicking the ball, I prefocused on the soccer ball. While the light was going down, my auto focus kept focusing on the trees behind him. Not what I was going for.

The golf ones didn’t involve timing as much. I quickly discovered that mid swing isn’t a very good picture, and I would have him pause at the top of his swing at the start, and at the end. I tried to get something a little bit different as well, hence the shot of him lining up a putt.

How to Photograph Cherry Tomatoes

f/22, 8 sec, at 55mm, 200 ISO, on a NIKON D90

f/22, 8 sec, at 55mm, 200 ISO, on a NIKON D90

This is more about how to photography any “still life”, not just cherry tomatoes. That just happened to be what I had on hand. We have a garden, and our tomato plants are growing like weeds. I thought they might be interesting to shoot, so I got out a white bowl and a white foam core board that I placed on the table.

I then got out a light stand, an umbrella, a flash, then scrapped them. I just pushed the bowl toward the window. This was a south facing window, and we are around dinner time, so there is no direct light. As you could see in the photos, I could have maybe added some fill light from a flash, but I think they turned out pretty well.

What I do want to share with you, are the tricks that I used to get the image sharp.

First, use a tripod. When you are shooting small items like this, you need at least some, if not all of the image to be sharp. If you use a large f-stop like f2.8 or smaller to get your shutter speed high enough to avoid a tripod, you will still likely have a bit of shake in your hands. The depth of field will be very small, and there is a good chance that the the stems will not be sharp. You need to direct the eye to somewhere sharp in the image.

f/5.6, 1/2 sec, at 48mm, 200 ISO, on a NIKON D90

f/5.6, 1/2 sec, at 48mm, 200 ISO, on a NIKON D90

Close down your aperture by using a number like f/16, or f/22. This will allow more of the tomatoes to be in focus. If you make a creative decision to only have a small section in focus, that’s fine too, but just pay attention to how much of the photo is in focus. When you select the small aperture, it will directly effect your shutter speed. Another reason to use your tripod.

Resit the urge to crank up your ISO. I often take pictures indoors at 400, 800, even 1600 of people, but once noise reduction is applied, the image is not as sharp, and that is what we are going for here. Turn it down to 100  or 200.

Manual exposure. It’s not that scary. Honest. And with digital, you see right away if there is a mistake. Start by using aperture priority, with our selected aperture. (I mostly used f/22) Take a picture and note the shutter speed. Switch to manual, and set that shutter speed. Now you won’t have to deal with the camera shifting your exposure while you shoot. You now adjust the shutter speed to keep the lens open longer to make it brighter, or shorter to make it darker.

Manual focus. This isn’t as scary as it sounds either. Really. You’re on a tripod right? Manual focus becomes much easier on a tripod. Flip the switch on your lens or camera body from auto to manual, and carefully turn the focus ring. Go back and forth in and out of focus a couple of times to get an idea of where the focus plane is. Pick something important in the image that you want to be the sharpest item, and use that. With larger apertures (f/4, f/2.8, etc) this becomes even more critical.

f/5.6, 1/2 sec, at 38mm, 200 ISO, on a NIKON D90

f/5.6, 1/2 sec, at 38mm, 200 ISO, on a NIKON D90

Blow your highlights. Or not. It’s up to you. But know this: if you have a window, or the white plate in the frame, they are not the focus of the image, and they are likely the blinkies or the right edge of the histogram that is freaking you out. You don’t want blinkies on the tomatoes themselves, but the window, and probably the plate edge are just fine. Try a few different exposures and see. What the heck, try a tomato HDR. (Wish I had thought of that earlier)

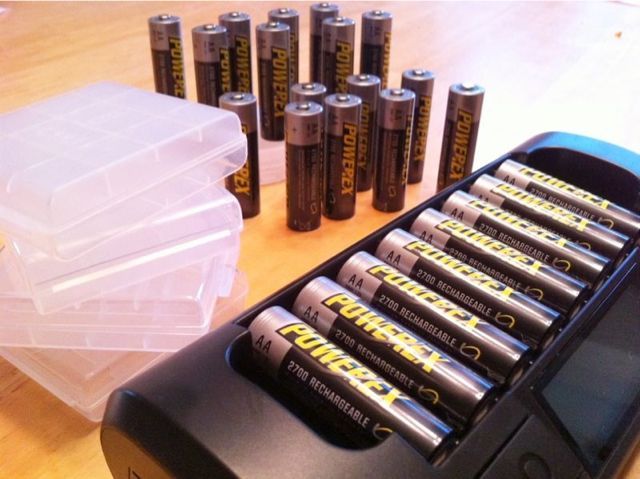
You need to remotely trigger the camera. Mashing the button introduces more shake than you think. So last night I searched all over the house looking for my cable release. I looked in boxes, and back packs, and my wedding bag, nothing. Ok, next best, I will use the wireless remote I bought a long time ago. Dead battery. Shoot. What to do? Timer. No need to set the timer to 10sec, just a couple will do. You will have one setting to set the length of the timer, then another to select that you want to use it.

Mirror lockup. I don’t use this much, but for close up work on a tripod, it works great. Again, this is to reduce vibration. What happens is that the mirror will swing, then pause, then take the picture and swing down. The pause helps the camera vibrations settle. Just another little thing that helps. Don’t forget to turn this off though.

So, now when you press the shutter release button, it will seem like nothing happens. The camera is on timer. It will pause for a couple of seconds, then the mirror will swing up, then the exposure of a sec or more (that’s what i had at f/22), then everything will close down, your image will appear on the back, and you can zoom in and chimp away.

So take a few pictures. Try to get as close as your lens will let you. Try an image with the plate just barely fitting. Try pulling back a bit and getting a bit of a place setting in the image with a few props. You might even try that fill light if you had it out and the kids aren’t already supposed to be in bed, won’t pick their story books, still screaming for a bedtime snack even though they just had ice cream 15 min ago.