iPad Ready and bgStretcher2 Update

I took this picture, from my iPod, of an iPad showing off my portfolio. It looks amazing. The images are actually sized perfectly for this device. But there was something weird. All the images in the night album, and the occasional other image won’t show. I get the blue image not found icon. Very weird. I wonder if they are exported with some weird settings. Not sure how that happened.

I was also able to confuse the javascript by pressing on the album and next/previous buttons. I will have to take a look at that. As noted yesterday, it doesn’t work well on the iPhone either. I also checked Kelby’s site again, and it looks great too, just not on the iPhone. I am wondering how that device reports it’s screen size. I might just need to look for that browser and then display presized smaller images.

If you want to get a rough idea of what your site would look like on the iPhone, check out iPad Peek. It doesn’t show the broken images like the iPad did, but it will give you a sense of size and how your content will fit. Just enter your site in the address bar at the top.

Are you iPad Ready? (No flash allowed)

Are you a photographer with a flash site? Do you know that the iPad, just like the iPhone, will not display flash content? What’s a photographer to do? Scott Kelby looked at this earlier today.

When Kelby first put up his flash portfolio, I decided to create a javascript only portfolio site to do the same thing. See my portfolio here, and my post here.

I think my code is successful, to a certain extent. It works great on the desktop, but doesn’t work as well on the iPhone, and I don’t yet know on the iPad. Need to try that out. Anyone that wants to comment about that, please do.

I think that my issue on the iPhone is the size of the images. I think they need to be smaller to save on bandwidth, and prevent the phone’s browser from having to scale the images so much. That may be the issue on Kelby’s site too, because his new non flash site didn’t work well on the iPhone either. His new portfolio is also a jQuery javascript site done by RC. It was too slow to be useable on my phone. I wonder if image size is the issue there to. Now his site was optimized for the iPad, not the iPhone, but I want mine to work on both. I will need to do some more testing with smaller images to see.

Kathy in Downtown Winnipeg

While in Winnipeg, I went to take some pictures of the Cathedral in St.Boniface with my sister Kathy as my model. Only thing was, there were no lights on the Cathedral. Easter? There was a service going on. Weird. Never figured it out. Luckily, as a resourceful photographer, I just turned around, and there was a nifty sunset going on. The picture above was the last of the images I took that night. I kind of wish I had taken some of Kathy with this much bluer (about tungsten) white balance, and gelled the flash, but I didn’t. So the auto white balance with the flash on is much warmer.

This, like all the images was shot in aperture priority, with the exposure compensation turned down two stops I think. I was using a 24×24″ lastolite softbox, in this case to camera left. A SB900 is inside with the diffusion dome on. The sky looks too orange really. Like I must have faked it. Also, I wanted Kathy to face the other way.

The bright orange is fading, and I am on auto white balance which may have shifted things. Also, the softbox is moved to the right, and I now needed to zoom to about 130 to get any light on Kathy. It still wasn’t quite enough, and I had to pop it up a bit in Lightroom. Decided that while the light was pretty good, the background could be better.

I moved up across a street and closer to the water, and even closer to her. I really like the light I got on Kathy this time, but the balance of the frame is not really there. Both Kathy an the bridge are on the same side, and there isn’t enough on the other side. She needs to move over.
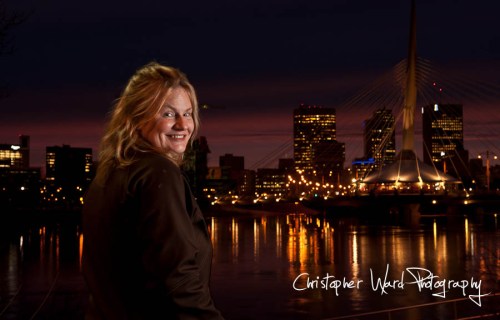
I like the balance in this image much better. Kathy is positioned right in front of the cranes, so you can’t see them. Moved the flash to the other side. Still zoomed, maybe a bit much, but getting fairly good balance of light and shadow on Kathy. Look at her hair. I didn’t give her enough instruction about staying still in the long exposures were were getting. The flash freezes her face will, but the hair shows movement. Kind of interesting, but wishing I had taken a few more. The things you can’t see on the little LCD.

Anyway, I should have played with the light balance more, or at least brought Kathy back into the frame after I got the first shot shown in this post. The white balance is much cooler,and the image is not as underexposed. Oh well. Live and learn. Lesson: auto white balance isn’t always your friend.

Hwy I29 Flooded at Harwood

I was traveling from Winnipeg to Minneapolis on March 21 when I ran into a long traffic line. Right in the middle of I29, I came to a stop. I knew that there was flooding issues. I had seen lots of water on the sides of the highway for quite awhile. Most of the flooding was occurring when there was a tributary flowing into the Red River. So when we came to a stop, I had an idea that it was water related.

I figured that there was a problem on the road and we were getting diverted. Maybe one side of the road was higher than the other and we were needing to have traffic from both directions merge onto one side of the divided highway. But I couldn’t see what the issue was yet. All I knew was that the water was getting higher and higher in my lane!

By this time the road had been narrowed to one lane, and there was less than an inch flowing across the road. Well, this isn’t too bad I thought. They wouldn’t keep the road open if there was a lot of water, would they? But the water kept getting deeper and deeper. There were shorter sections where it dipped at bit, and the truck in front of me was making pretty big splashes, especially considering we were going so slow.

I figure that the most water we went through was about  6 in. That was enough for me. I was expecting my hybrid to get swept away!

I took some video with the D90 too, but don’t have that processed yet. I had it resting on the steering wheel, which turns out not to be the most stable place. Seem like you have to turn it a little bit! Made it back safe. That looks to be where the worst of the flooding was on I29.

I am pretty sure that it was the Sheyenne river trying to make it’s way to the Red river.

Creating a Proof Book at WHCC

I usually use White House Custom Color for my printing needs. I even use them for prints I make of my kids. I just love the way the pictures look from them. I have had standouts, large panoramas, 8×10’s, 5×7’s, canvas prints, and large prints of my landscapes that hang in my house. I have had a lot of things printed by them, but I had a new requirement recently.

I had committed to doing a silent auction that was a fundraiser for my kids school. I figured that only having some business cards there wasn’t going to be enough, I need to have some pictures. I wanted something bound, but didn’t want to go all out for a book. What I got from WHCC isn’t exactly a proof book. They sell those too, and they are a way to print multiple images per page. I figured bound 5×7’s would be nice.

I fired up their ROES software, and selected from the Catalog drop down, Thrifty Proofing 5×7. You can then just add images to your queue as you would for any order. The order you add them will be the order they show up in your book. Here’s a tip: If you want more two books, change the quantity of the individual images from 1 to 2, and in the special instructions box later on, indicate you want two books.

You can choose to have the images get a white or black border to them, but I just went with the full 5×7 images. Then when you select “Review Order” you will get to select how to make your book. You could choose to use Thrifty Proofing without getting a binding if you wanted. I chose to place the binding on the long edge, but you can do short edge as well. The coil binding is a $5 fee. I also picked the clear cover, but you can pick frosted.

One other thing that I did was to create a “cover image” with my name on it that I moved to the top of the order so it would be the first image. This seems like a wise thing to do, because there are no other markings on this book at all.

The other nice touch is that there is a heavy piece of black cardboard that comes after the last image. It really makes it feel much more like a book, and helps to protect your images.

Shipping is really fast, and you can always get a person there on the phone in short order if you have an issue. (Such as not knowing how to get multiple books) They always help me out.

I like this proof book. I would give it a try. I will probably get some others done at some point.

Night Time Photowalk with the Family

My kids like to go on a “night time walk.” That just means that we walk around the block at night. One thing we do that probably makes it the reason they like to go on the walks, is let them take flashlights. Right now, their favorites are headlamps that they got as presents from their aunt.

When we headed out on this walk, it was almost dark. Very little light, and fading fast. I still took my camera. I had a 50mm set to manual at f/1.8 and 1/45 second. I tried slower, but the kids move too much. The pics were too blury. I tried a couple of posed shots, but they didn’t go over well. I got “the look.”

It’s better to just let them play and see what you get anyway. I wasn’t looking for technically fabulous shots, but just some interesting moments of my kids on a walk. They don’t really walk by the way.

They pick up stones, walk on low railings/fences, jump, run, and splash in the puddles. Walking is just too boring. The great thing about this night was that it was warm, with piles of snow on the sides, and melted snow in puddles in the middle. All sorts of great things to do.

So, if you wondered at the beginning why we only go one block (maybe two on a very special night), now you know. One block can take quite awhile to get all the way around.

So get yourself some flashlights, and head out into the night. You don’t need to try for perfect exposures. Try using the light from the flashlights, the streetlamps, the house lights, etc. None of these pictures were taken with flash. The on camera flash can look a little harsh. Turn it down if you want to try to use it. There is actually quite a lot of light out there without it.

RS-7 Blackrapid Camera Strap Review

Old style star washer

I have had a black rapid strap, model RS-2 for a while now. I was really excited to get one, and loved it but…  Were you expecting a but? It wasn’t perfect. I loved the innovative way the camera hung at my side, hanging there waiting for the moment that I needed to quickly raise it to my eye. But, I had a few complaints I discovered after using the strap for a while. This is a bit of a RS-2 to RS-7 comparison. (Keep with with me, the complaints are all fixed)

  • I didn’t like the connector thingy. (Technical term) It was just too bulky. It looked like a good first try from someone welding things together in their garage. It worked, but didn’t look pretty. And I lost mine. Twice. Some people even tried tying their strap with a little make-shift cord connector. That didn’t always work out.
  • It was bulky. The strap seemed a little too wide. Too much material. It just felt too noticeable, especially with a jacket on. The model I had also had this whole extra flap that held memory cards, business cards, and had a pocket on it for a cell phone. This sounded good at the time, but just ended up feeling bulky. I felt like the cell phone pocket was right at my chin, like a poor mans hands free phone system. I eventually cut off the extra, but it still seemed a little stiff and bulky.

New Connector

  • The strap wasn’t like better backpack straps that are curved to conform to your shoulder a little better. I found it would slip off sometimes too.
  • My strap didn’t have a clip to hold the excess webbing strap. That was probably because I cut off part of the padding (the pockets) to make it smaller. It also seemed like it could use another clip to keep the camera from sliding around. If you switched shoulders it seemed like the clip was on the wrong side.
  • The connector was completely re-engineered. It now looks very professional, and more importantly, works wonderfully. It is much smaller. It piece that screws into the camera is a much lower profile, and has a piece of rubber on the end. This does two things. Not having the lock nut and instead having the rubber make it more secure, and doesn’t seem to loosen anymore. The lower profile means that you can hold the camera with a portrait grip on it, which really wasn’t possible with the other connector. And last, using the locking mini carabiner allows you to remove the strap if you need to with needing to unscrew the whole thing.
  • The new RS-7 strap is thinner. Much better profile, and this one doesn’t have any bells and whistles. Some people might like pockets and stuff on their strap, and they still have models that have them, and an accessory pocket can be attached to the RS-7, but if you don’t want the extra material, you don’t have to have it.

RS-7 vs Modified RS-2

  • The new RS-7 is curved. Not by much, but it works. It seems to stay on my shoulder better, feels more comfortable, and seems less prone to sliding off. Seems great.
  • This RS-7 is much more finished in every way. No matter which side of your head/shoulder  you wear this strap, it still fits well. There is a new clip that keeps the strap from flapping, and there are two clips that are designed to keep the camera in place, no matter how you wear the strap.

I did say I loved this strap didn’t I? Ok, at first I loved it, then as the issues came up, I stopped wearing it as much. Then the improvements started to come out.

The first strap I had felt like a great idea that was put together in someones garage. functional, but not the best finish. This strap is a whole new level. The straps, buckles, padding, connector, and even what they left off are seem perfect now. If I had to come up with one item for an update, it would be to have the material under the strap to be “stickier”, like a rubber or something that would cling to nylon/rain jackets better. This isn’t as important on a strap you wear across your body, but I sometimes fell it moves a little, and I have to keep putting it back in place.

That’s all I can come up with on the negative side. I love it. If you are replacing your strap, definitely consider this one. I think it’s worth the money.

Testing Very High ISO with the D90

So I decided to try the HI1.0 ISO setting on my Nikon D90. That is actually ISO 6400. This image was shot without a flash with a Nikkor 50mm f/1.8 at 1/20th of a second. I shot in RAW and adjusted the white balance a bit, and the brightness in Lightroom very slightly. Otherwise, this is the image.

Noise is quite obvious. It actually doesn’t look quite as bad in this little image, so I exported larger ones too, that if you click on the image you will see a larger version. There the noise is even more noticeable. I don’t think I would really want to use this setting. The only reason I even wanted to try it was a friend had taken some at this setting on his Nikon D5000 (about the same sensor) and thought they were fine. Me, not so much.

Now, it was taken while the camera had high ISO noise reduction on. I am wishing now I had taken another with that off for reference. Also, one in JPEG mode with and without it turned on. Sounds like another post.

Ok, I wanted to see if I could make the image usable, so first I ran it through the Nik Define filter within Photoshop. It may be that I don’t know how to use the filter yet (used default settings), or it could be that there was just too much noise, but I wasn’t that impressed. Then I turned it over to Nik Silver Fx Pro. I have used this filter a bit more, and I thought the BW turned out pretty well.

I think it hides the color noise, and looks more like grain than noise now. Maybe usable. At least it allows you to get a shot that you never would be able to get otherwise. Now, to be fair, it was really dark. Only my child’s night light was on. I had a hard time focusing. But the great take away from this is that it would be awesome to take pictures at this ISO, and you can with cameras like the D700 and the D3 versions. I am really starting to like the idea of a full frame camera. Someday…

Carrying Your Camera Every Day

Henri Cartier-Bresson, Chris Orwig, Jay Maisel, and even Moose Peterson would be proud of me. Well, maybe not proud, but they would at least approve.

After getting through Chris Orwig’s book, Visual Poetry, I decided that I would take my camera everywhere. Where ever I was going. I took the battery pack/portrait grip off my D90, and put on a 50mm lens. I attached my black rapid strap, and decided I was ready. That’s it. No bags, no filters, zoom lens or options to get in the way.

I started taking it to work every day. This is where it got frustrating. I get in my car, drive to work, put my camera on my desk, do my work, pick up the camera, get back in the car, go back into the house.

There have been some days that I have stopped and taken a disappointing sunrise shot with my iPhone, so there may be the odd occasion to use it.

It is frustrating that I don’t have more opportunity for found objects or moments. I wish I walked or took a train. It just isn’t practical from where I live to where I work. The opportunities when you put one foot in front of the other become endless. When you put your butt in a seat with severe time constraints, things are more limited.

So the camera sits on my desk taunting me.

“Why don’t you pick me up and practice changing ISO without looking at the dials?”

“Why don’t you look at my little screen and see what images you have squeezed out of your life in the last few days?”

“Why don’t you pick me up and take some pictures of something, anything that moves or doesn’t move, but something?”

Argg! I have other work to do. I am not sure this is working.

Henri Cartier-Bresson