
Here is a video I put together from some stills of Hanna and her friends. This was taken this past spring. Somehow the pictures got lost in the shuffle. I am sending the pictures off today, and figured I would throw together this slideshow video as well.
Category Archives: Photo Shoot
Yoga Pose Pictures Taken in new Studio

I have had a project in the back of my head for awhile now. The idea was to take pictures of people doing yoga poses in a studio environment. Why yoga? Well, I know several people that do yoga, and it seemed different enough from the standard studio type shots, that if would be both interesting to shoot, and hopefully interesting to potential clients.

The first issue I had was to find a studio. That was harder than I thought. My area of Minneapolis is more conducive to high mortgages than to low rent studio space. I then found uClick, a studio that you can rent space from. I will blog more about this place soon, but suffice to say, I now have a place to shoot studio pictures.

Second was to find willing subjects. I asked a few of my friends that do yoga to help me out. First up is Steve. He has been doing yoga for a couple of years now, and has started a training program to be an instructor. A special thanks to Steve for being the first in line. I have been to yoga a few times with my wife, and just started to learn some of the poses. I by no means know a lot about yoga, but knowing something helps in the communication with your model, and knowing when they are in a pose, or transitioning, or how hard it is to hold.

So I mentioned earlier about potential clients. I am looking for individuals that would like their own yoga poses in pictures, as well as looking to approach studios. One possibility is to see if a studio would be interested in having me come into their studio to take pictures. That way I could take pictures of several people, and the cost per person could be lower. If you know of a studio that might be interested, let me know.
Dance and Swimming Portraits

This is part two of my “Proud parents wanting something just a little different from their sports pictures” series. The dance pictures were interesting to take, because she started out a little shy, and I didn’t know what type of dance moves she was capable to doing. I didn’t want to ask for something that she was unable to do, and then have her get discouraged.
The lighting was the same as in yesterdays post. I had a SB900 in an umbrella high on the left, almost directly at her side. I had another SB900 on a gorilla pod stand with an umbrella draped over it. I would have placed it higher, but didn’t have another stand with me.

We started off with some of the more basic, and static moves, and joked around a bit, until she loosened up, which truth be told, was not a very long time. We were then able to get some other “action” type moves where I would capture her in mid air. This picture may not have captured her legs quite as high as some that we took, but it looks the most effortless.

We moved on to the swimming pool late into the light. It was between disappearing fast, and almost gone. We were going to need lights to get anything to work here. The swimming shots were all with one light. When the light was near by, it was not zoomed in, but when taking the shots of her father away, I zoomed the flash to 200mm I think. It was a SB900 hand held by her mother. Sometimes we also aimed it through an umbrella, but not always. The lights were held at pool level. No lights fell into the pool.

I had her going back and forth several times as we fine tuned the lights, and then tried to get the timing down. It took awhile, but got it in the end. I think the pictures we got of the butterfly and the breast stroke were the ones that worked the best. They are the most dramatic looking at least.
These were a lot of fun, and I hope to get to do this again with some other kids soon.
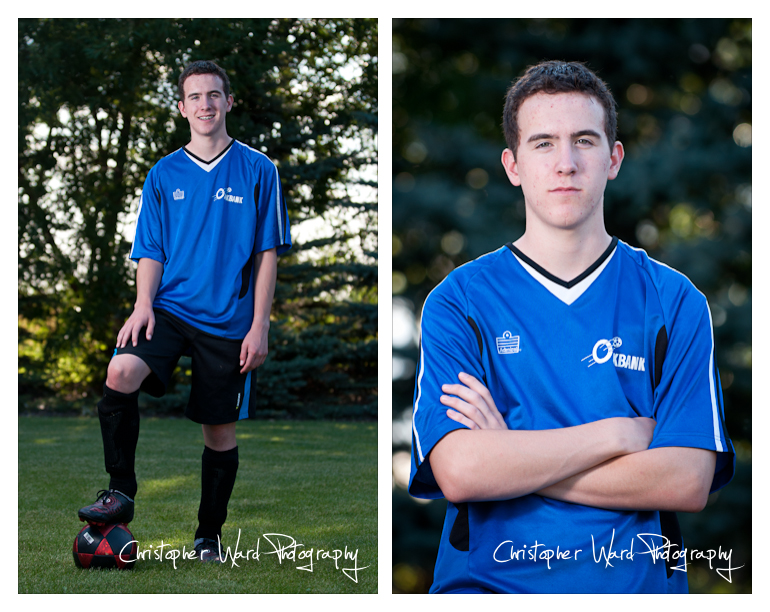
Soccer and Golf Portraits

I was asked to take some pictures of a young man depicting the sports he loves and the guy the parents are so proud of. Every year they get pictures taken by the typical event shooters, and they tend to be pretty static pose, grin, shoot shots that end up looking very posed. We were going to try for more action, and more natural.
This was to be a back yard shoot. Luckily, this house is in the country, with lots of space. There was a large row of trees that we chose to be the back drop for the activities. I placed him probably close to 20ft from the background, so the trees would blur somewhat. I showed up when the sun had started to fall behind these trees, so there was no direct sun. I suppose there was some coming through the trees. I set the camera on manual, and let those spots blow out.

I always seem to forget to take a picture of the lighting setup, so I will have to describe it. I set the main light, a SB900 in a shoot through umbrella high to my left. It is rotated fairly far around on him, 10-20 deg. This was a last minute thing while I was traveling in Canada, and I didn’t have a second stand, so I used a second SB900 on a gorilla pod, on the grass, way around the right side, also about 10-20 deg off axis. I had an umbrella lying over this pointed somewhat up.
The lights stayed pretty constant to the subject. I moved around a little bit to get different camera angles, but the light was fairly consistent. We had a small stick in the grass where he was to stand most of the time.

Many of the soccer shots were timing shots. It took a few takes to get what we wanted, between me, the subject, and his mother. I didn’t want to do much in post, so we wanted to hit it right on the grass. For kicking the ball, I prefocused on the soccer ball. While the light was going down, my auto focus kept focusing on the trees behind him. Not what I was going for.
The golf ones didn’t involve timing as much. I quickly discovered that mid swing isn’t a very good picture, and I would have him pause at the top of his swing at the start, and at the end. I tried to get something a little bit different as well, hence the shot of him lining up a putt.

How to Photograph Cherry Tomatoes

f/22, 8 sec, at 55mm, 200 ISO, on a NIKON D90
This is more about how to photography any “still life”, not just cherry tomatoes. That just happened to be what I had on hand. We have a garden, and our tomato plants are growing like weeds. I thought they might be interesting to shoot, so I got out a white bowl and a white foam core board that I placed on the table.
I then got out a light stand, an umbrella, a flash, then scrapped them. I just pushed the bowl toward the window. This was a south facing window, and we are around dinner time, so there is no direct light. As you could see in the photos, I could have maybe added some fill light from a flash, but I think they turned out pretty well.
What I do want to share with you, are the tricks that I used to get the image sharp.
First, use a tripod. When you are shooting small items like this, you need at least some, if not all of the image to be sharp. If you use a large f-stop like f2.8 or smaller to get your shutter speed high enough to avoid a tripod, you will still likely have a bit of shake in your hands. The depth of field will be very small, and there is a good chance that the the stems will not be sharp. You need to direct the eye to somewhere sharp in the image.

f/5.6, 1/2 sec, at 48mm, 200 ISO, on a NIKON D90
Close down your aperture by using a number like f/16, or f/22. This will allow more of the tomatoes to be in focus. If you make a creative decision to only have a small section in focus, that’s fine too, but just pay attention to how much of the photo is in focus. When you select the small aperture, it will directly effect your shutter speed. Another reason to use your tripod.
Resit the urge to crank up your ISO. I often take pictures indoors at 400, 800, even 1600 of people, but once noise reduction is applied, the image is not as sharp, and that is what we are going for here. Turn it down to 100 or 200.
Manual exposure. It’s not that scary. Honest. And with digital, you see right away if there is a mistake. Start by using aperture priority, with our selected aperture. (I mostly used f/22) Take a picture and note the shutter speed. Switch to manual, and set that shutter speed. Now you won’t have to deal with the camera shifting your exposure while you shoot. You now adjust the shutter speed to keep the lens open longer to make it brighter, or shorter to make it darker.
Manual focus. This isn’t as scary as it sounds either. Really. You’re on a tripod right? Manual focus becomes much easier on a tripod. Flip the switch on your lens or camera body from auto to manual, and carefully turn the focus ring. Go back and forth in and out of focus a couple of times to get an idea of where the focus plane is. Pick something important in the image that you want to be the sharpest item, and use that. With larger apertures (f/4, f/2.8, etc) this becomes even more critical.

f/5.6, 1/2 sec, at 38mm, 200 ISO, on a NIKON D90
Blow your highlights. Or not. It’s up to you. But know this: if you have a window, or the white plate in the frame, they are not the focus of the image, and they are likely the blinkies or the right edge of the histogram that is freaking you out. You don’t want blinkies on the tomatoes themselves, but the window, and probably the plate edge are just fine. Try a few different exposures and see. What the heck, try a tomato HDR. (Wish I had thought of that earlier)
You need to remotely trigger the camera. Mashing the button introduces more shake than you think. So last night I searched all over the house looking for my cable release. I looked in boxes, and back packs, and my wedding bag, nothing. Ok, next best, I will use the wireless remote I bought a long time ago. Dead battery. Shoot. What to do? Timer. No need to set the timer to 10sec, just a couple will do. You will have one setting to set the length of the timer, then another to select that you want to use it.
Mirror lockup. I don’t use this much, but for close up work on a tripod, it works great. Again, this is to reduce vibration. What happens is that the mirror will swing, then pause, then take the picture and swing down. The pause helps the camera vibrations settle. Just another little thing that helps. Don’t forget to turn this off though.
So, now when you press the shutter release button, it will seem like nothing happens. The camera is on timer. It will pause for a couple of seconds, then the mirror will swing up, then the exposure of a sec or more (that’s what i had at f/22), then everything will close down, your image will appear on the back, and you can zoom in and chimp away.
So take a few pictures. Try to get as close as your lens will let you. Try an image with the plate just barely fitting. Try pulling back a bit and getting a bit of a place setting in the image with a few props. You might even try that fill light if you had it out and the kids aren’t already supposed to be in bed, won’t pick their story books, still screaming for a bedtime snack even though they just had ice cream 15 min ago.
Pictures of Grandparents

Sadly, I was not into photography before 3 of my 4 grandparents passed away. My mothers father is still with us, and had his 90th birthday party a couple of weeks ago. I have been trying to get a good picture of him for quite sometime. I find that people of his generation always move into a serious type look which I wasn’t looking for. I wanted something that still showed life, humor, and fun. With the picture above, I believe I got what I was looking for.

I was waiting in the wings while he talked to friends and family, and at this time, he was less conscious of the camera, and I got the moment I was looking for. I managed to get some pictures of a few other family members as well in those candid moments that don’t result from pointing a camera and saying “smile”.

You may be looking for a different look than what I wanted here, and that’s fine, but I encourage you to get out and take pictures of your grandparents, parents, uncles, or other family members older than you. I take pictures of our extended family’s younger generation all the time, but our older generation deserve a good picture to be remembered by.


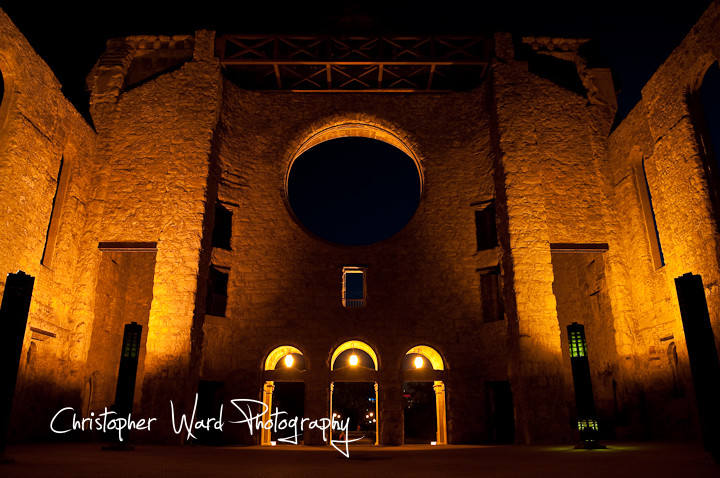
St Boniface Cathedral at Night

I have always liked the St. Boniface Cathedral, or at least what is left of it. I have been trying to photograph it at night for several years now. Every time I am in Winnipeg, something comes up that prevents me from getting there. Usually time. I have even gone to the grounds to find that the lights were not turned on that night!
At least I got there this time. But to do it, I had to borrow an old, slightly broken, and not very stable tripod I found in my parents basement. It was better than nothing. I got a couple of pictures, but didn’t hang out quite as long as I would have liked. I will try again to get there a bit earlier too. I didn’t get enough blue in the sky for what I was looking for.
Anyway, the Cathedral you see is just a facade. It was burned twice. The structure that remains was built in 1906. In 1972 a new Cathedral was built on the grounds. It appears to be inside some of the original stone building, behind this facade.
The Cathedral is within what is considered the “french section” of Winnipeg. There are many other French cultural and historical buildings within the St. Boniface area of Winnipeg. I grew up at the other end (south) of St. Boniface.
One thing I appreciate about the location, is that photography appears to be encouraged. There are lights on the building, and photographers always seem to be around. The grounds also contain a grave yard, but no one guarding or ushering people away. On the grounds, Louis Riel is buried, a very important French/Metis historical figure. I would imagine that all Canadian kids, not just Manitobans would have learned about him in school.
Some of this information was taken from this wikipedia article


Nikki and Steve’s Engagement Pictures
I have a location in the Nicollet Island area that I like to take pictures at. I usually think of it as a place for Senior Photos, but Nikki and Steve wanted something a little different, and I think it worked out great for them. Their wedding is coming up soon in August too, which should be a fun time.
Nikki and Steve were a lot of fun to shoot. We walked around the area to a few different places to take pictures. Did I mention it was hot last weekend. We were out in the morning, so it wasn’t the hottest part of the day, but it got to 90 degrees mid afternoon. They were great sports about being out in the heat.
Anyway, here are a few pictures from the day last weekend.


Looking forward to the wedding in August! See you then.
Brainerd Racing

I was up at the Brainerd International Raceway (BIR) to shoot some pictures for Pat Rounds, the Orange 27 car. It was a lot of fun. It was quite a bit different type of shooing than I was used to. I got to work on my panning again.
I found out which corners where going to be where the action was, and tried to set up there, but I always seemed to be one corner ahead of where something exciting happened. You really need to be paying attention too. At one point in the race, the start officials had to hit the deck when a car came straight at them. And I had been right there earlier in the day!
Panning consistently was key to getting a lot of the shots, but these guys are almost always accelerating or breaking or shifting, so it was hard to stick with them smoothly. I think I got some that worked though.
At the beginning of the day, I saw another photographer with a longer lens, and went to say hi. He was inside the “hot zone” where spectators were not allowed to be, but I had been put on the pit crew for Pat, so I was supposed to be allowed to be there. Anyway, this photographer wouldn’t shake my hand, and wouldn’t give me the time of day, other than to tell me that if I wanted to shoot there I needed a media pass. I told him I had a pit crew pass, and he told me that wasn’t good enough. Fine.
I headed over to the registration tent, and asked for a media pass. They said sure, I should them a business card and $15 dollars. I was now legit. I headed back to show off my pass, but he was gone. Didn’t see him for the rest of the day. It was helpful to have though. I would walk up to the race volunteers, say “I have a media pass, can I shoot from over there?” and I always got to go in front of the fence, but behind the concrete barrier.
Well, I think I will try to get back sometime, just not sure when. I have lots of the pictures up on photoshelter, and I trying to contact some of the racers. Here is a small sampling.


Photographing the Brainerd Raceway

I went to the Brainerd International Raceway to take pictures for Pat Rounds in the orange #27 car that you see above. It was a lot of fun, and I have more to say about what worked, and what didn’t, but for now, I am calling it a night. I just wanted to get a picture up. More later.